Final Blog Post – Partners with Nathanial Garrett
https://portfolio.wcu.edu/nhgarrett1/ – link to Nathaniel’s Final Blog Post
Fire Fighting Robot
The Challenge

Our robot making its way through the maze
The problem that was given to us was to put out a flame at the end of a maze that had 2, 90 degree corners. This could either be a left hand maze or a right hand maze. Both were identical mirror images of each other. Once the robot was able to navigate to the end of the maze, an ultrasonic sensor was used to sense a flame or light which triggered a fan to blow out the light.
We decided to use the foamboard that was provided for us as the basic frame for our robot. We then created and 3d printed wheels, motor mounts, an untrasonic sensor mount, and tail skid. After testing the robot in the maze we decided to trim the rear corners of the robot to create more clearance from the walls during turns.
Coding and Problem Solving
My partner and I both learned a lot about coding in C++. Coding the robot became much more difficult as we began to add more and more layers onto getting the robot to navigate the maze. It also became much easier to leave out small bits and pieces that rendered the entire code useless until we figured out the solution. Once a successful forward, right, and left turn function were created, solving the maze became a much more realistic goal. Many groups used multiple “if” statements imbedded within each other but my partner and I were not able to figure that out. We finally were able to solve the maze using dimensions, two sensor readings, one if statement, and one else statement. Keeping our code organized and using function calls was crucial to getting our robot to solve both the left hand and right hand maze.
Approach
I created a mount in onshape for our flame sensor that put the sensor up high on the very front of the robot to allow it to easily sense a flame or in this case, the light from a phone. I also created a tail skid that mounted in the rear of the robot that allowed the base of the robot to be a level surface. This was the first piece that I had created that had multiple extrusions on multiple different axis’s. My partner and I decided to each design our own wheel for the robot and have both of our designs represented on the robot.
-
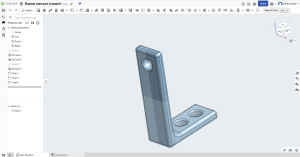
- Fire sensor mount design
-

- Tail skid design
Conclusion
If I had more time to work on the robot I would create a different style of wheel that got traction on hardfloor surfaces without using rubber bands. The rubber bands caused a lot of headache after they would constantly fall off and cause the robot to not get any traction. I could use a different type of 3d print material that is soft and rubbery on the outside of my rim that would give my wheels grip on the hard floor.
Recent Comments