For the final part of my final project, I combined almost all of the components of the previous posts into one fire-fighting robot. To do this, I used the stepper motor with wheels mounted to it in order to move, the ultrasonic sensor to detect the walls of the maze, a UV sensor to detect a flame, and a fan to put out the fire.
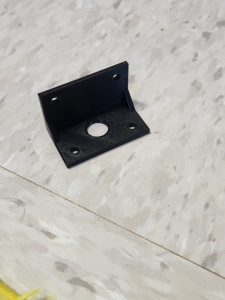
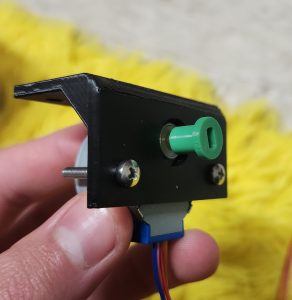 The first component is the motor and wheels. I 3D printed a motor mount for the stepper motor I used (seen left). This matched the mounting holes on the motor and included a hole for the output of the motor. On the other side are two holes for mounting to the chassis of the robot. I then began 3D printing hubs to find out the exact size needed to press fit onto the motor’s output shaft. An example of this hub can be seen on the right. Once I found the perfect size, I printed a full-size wheel with the same dimensions which can be seen at the end of this post, on the final robot.
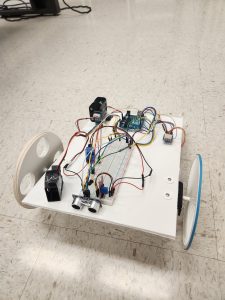
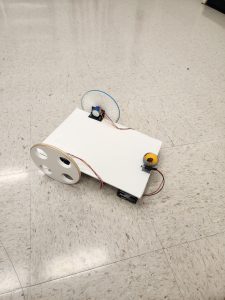
My partner, John Crain, 3D printed a roller wheel assembly so that the robot can now have 3 wheels instead of just the two powered wheels. This assembly houses a ping pong ball to allow the rear of the robot to move freely. Next, my partner and I connected the ultrasonic sensor to the front of the robot. This is used to measure the distance to the wall in front of the robot and determine when to turn left (Our maze consisted of only left turns). The final part was the flame sensor and fan assembly. I connected the flame sensor near the front of the robot so that it could detect when the robot was approaching a flame. The flame sensor detected a flame in near proximity, the Arduino activates a relay which is used to power the fan which puts the flame out. Below are the pictures of the robot all put together.
The final component of making the robot work was to program it. To do this, I started by writing generic functions like DetectWall so that I could develop all of the code in simple terms. I developed all of the logic for what the robot should do, such as move forward if there isn’t a wall, turn left if there is, and activate the fan if there is a flame detected. Then I pulled the code from all of our previous assignments to perform all of these tasks so that I didn’t have to re-write it all. There were a few complications in this part of the coding because I had to manipulate a lot of the values to get the robot to function how we wanted. My partner and I tested it repeatedly while changing values such as the distance that the robot should measure before deciding to turn left, and how long it needed to spend turning before it had completed the full 90-degree left turn. Once we completed this, our robot was finally able to consistently put out the fire at the end of the maze. The video of our successful robot is linked below.
If I had had more time to develop this robot, I would have programmed it to be able to navigate more complex mazes. As you can see in the video above, our “maze” was only two left turns. If I had more time, I would develop the robot to be able to navigate a maze with left and right turns. Another thing I would’ve liked to add is some sort of mechanism to determine, in real-time, how far the robot had turned and how far it still needs to turn. By doing this, we would’ve been able to ensure that the robot turned exactly 90 degrees every time, even if the wheels were slipping. Lastly, below is the link to my partners blog post on this same project.
https://portfolio.wcu.edu/jecrain1/2022/12/15/fire-fighting-robot/
Trackbacks/Pingbacks