Intro
In my ENGR 199 (Intro to Engineering Practice and Principles) class, taught by Dr. Adam Harris, I had a group project instead of the traditional test for a final. The project was to build a robot that could “solve” a maze and blow out a small flame. My teammates, Joshua and Shaneil both wrote blog posts about the project.
Link to Shaneil’s blog post
Goals
My team’s goal was to build a robot that could smoothly navigate a maze and put out a flame. The maze had 2 turns, but it could be set-up with only left turns or only right turns. However, my group decided to go a step further. We (successfully) designed our robot to be capable of solving the left and right versions of the maze.


3D Printing
Throughout the semester, I had been designing some of the 3D parts that I would need for this project. My motor mount (full post here) and wheel (full post here) were both used on the robot. I was careful to print every part with at least 15% infill. This prevented my parts from breaking when they were carrying the weight of the chassis and hardware. My group’s biggest difficulty with the wheels was that the rubber bands we were using for traction kept slipping off. We eventually just taped the rubber bands to the wheels.
Hardware
The ultrasonic sensor (full post here) was one of the most important components of the robot. Without the sensor, the robot would not know when to turn to avoid hitting a wall. An Infrared sensor was used to detect the flame. When the flame was detected, a relay turned on a small flame (full post here). In the program, these sensors had to be activated in a very specific order. Before the robot drove forward, it had to check for a flame and then check for a wall.

Program
Throughout the semester I wrote code to control the sensors and stepper motors individually. To control the robot and blow out the flame multiple programs had to be combined. Using functions was unique to this project and many if-statements were used to give the robot the ability to make “choices”. Joshua did most of the extra coding that was needed to combine the separate programs. We used functions to make the robot drive forwards, backwards, left, right, and pivot. If we hadn’t used functions, the robot would have just spun in a circle. This is because only one wheel can spin at a time. The function still makes the wheels spin one at a time, but it alternates between the two motors so quickly that the robot can drive straight
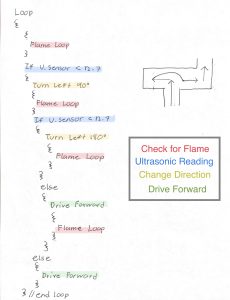
In the early stages of testing, the robot would start the maze by turning instead of driving forwards. I figured out that the problem was the ultrasonic sensor was detecting our hands while we were setting it on the ground. The solution was to add an 8 sec delay before the actual program started. When the ultrasonic sensor started detecting impossible values, I solved the issue by inserting a piece of code that Dr. Harris showed me from a different project I used an if-statement with a maximum value to “throw away” readings that were too high. This prevented the robot from acting based on faulty data. My biggest contribution to the programming of the robot was figuring out how the if-statements needed to be written. The nested if-statements makes the robot capable of checking 2 directions before making the decision to drive forwards or turn. Here is a picture of the pseudocode that I wrote.

Final Product

Conclusion
Overall, this project was really fun and helped introduce me to engineering in a unique way. It wasn’t too difficult and the experience I gained in CAD and programming will be useful in future classes. If I did this project again, I would 3D print a hollow chassis that could contain all of the wires and electronics. I would also write a flame function in the program. Currently, the entire flame if-statement loop is copied wherever it is needed and this makes the program very hard to read and debug.

Recent Comments