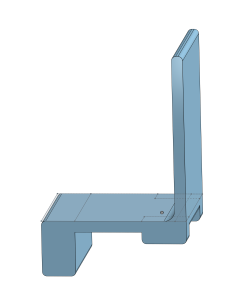
For my first-year engineering class, I had to take a preexisting project and change the circuit, code, and any 3D-printed parts. I modified this motion-controlled wheelchair by afsh_ad on Project hub. Before altering the circuit and code, I had to recreate the project—the original project left out a few things essential for building it. The project had an incomplete parts list and did not include links to the code libraries that were used. The parts that the list was missing were the accelerometer and the wheels. The code libraries that the project was missing were the nRF24 library handles radio communications, and the mpu6050 library, which handles communication to the accelerometer and gyroscope chip. Instead of using acrylic sheets for the base as the original project did, I designed and 3D-printed the base. I had to make some alterations to the base design as my wheels have a smaller diameter than the ones in the original project. I got the measurements from laying out the different circuit components. I used a ball bearing as the third wheel in the front. I printed out some spacers so the circuits would not be directly attached to the base. I used silicon to glue everything together. I also added counterweights to keep the wheelchair from leaning backward.
When working on the controller for the wheelchair, I had to splice some wires together to connect it all without a breadboard. I joined one end of the battery pack with a wire cut in half. I twisted the ends together before soldering them and then adding heat shrink. I also spliced the other end of the battery pack with half of a wire to make it easier to connect to the Arduino.
After recreating the project, I could begin to modify it. I added an ultrasonic sensor so the wheelchair could detect walls. Due to the limited amount of ports, I had to splice some more wires together so the ultrasonic sensor could connect. This time I cut two wires in half and joined three halves together. I had to do this for both ground and power. Furthermore, I reused the code for the ultrasonic sensor from a previous project with the original code to make it so the wheelchair would stop when a wall was within 5 inches. I added an if and an else statement so the robot would only drive forward if the distance between it and a wall is greater than 5 inches.
    if(data[0] > 380){
     if(inches > 5){ //the wheelchair can only go forward if inches is greater than 5
       //forward
       analogWrite(enbA, RightSpd);
       analogWrite(enbB, LeftSpd);
       digitalWrite(IN1, HIGH);
       digitalWrite(IN2, LOW);
       digitalWrite(IN3, HIGH);
       digitalWrite(IN4, LOW);
     }//end distance if

     else{ //prevents wheelchair from going forward if a wall is to close
      analogWrite(enbA, 0);
      analogWrite(enbB, 0);
     }//end else

    }//end if
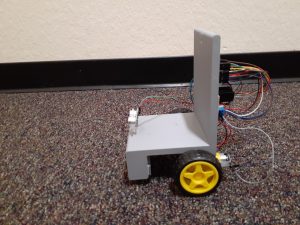
Here is the completed project.
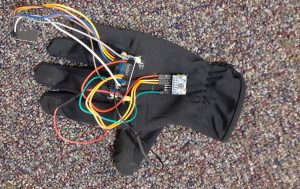
Here is a video of the completed project.
Here is the list of tools used.
Heat gun
3D-Printer
Wire cutters
Silicon
Here is the list of parts.
nRF24 Module – Link: Amazon.com: Aideepen 2PCS NRF24L01+ 2.4GHz WL Transceiver Module R-F Transceiver Module : Industrial & Scientific
Arduino Nano R3 – Link: Amazon.com: Mini Nano V3.0 ATmega328P Microcontroller Board w/USB Cable for Arduino : Electronics
SparkFun Dual H-Bridge Motor drivers L298 – Link: Amazon.com: Songhe L298N Motor Driver Controller Board Module Dual H Bridge DC Driver Stepper Motor For Arduino Smart Car 3PCS: Electronics
MPU6050 Accelerometer – Link:HiLetgo 3pcs GY-521 MPU-6050 MPU6050 3 Axis Accelerometer Gyroscope Module 6 DOF 6-axis Accelerometer Gyroscope Sensor Module 16 Bit AD Converter Data Output IIC I2C for Arduino: Amazon.com: Industrial & Scientific
Wheels and the DC motors – Link:Amazon.com: Gebildet 8pcs DC3V-12V DC Geared Motor, for Aircraft Toys/Robotic Body/Four-Wheel Drive Toy Car, Batch Number: Double Axis 1:48 : Everything Else
9v battery connector – Link:Amazon.com: DaierTek 3pcs 9V Battery Holder with ON Off Switch Cover Lead Wires 9 Volt Battery Case Connector : Electronics
Heat shrink tubing – Link:650pcs Heat Shrink Tubing Black innhom Heat Shrink Tube Wire Shrink Wrap UL Approved Ratio 2:1 Electrical Cable Wire Kit Set Long Lasting Insulation Protection, Safe and Easy, Eco-Friendly Material: Amazon.com: Industrial & Scientific
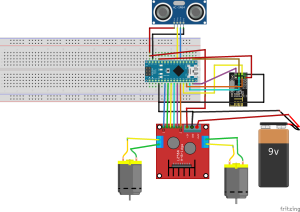
Here is the diagram of the modified circuit.
This is only the circuit for the wheelchair to get the circuit for the controller view the original project here.
Here is the code.
This is only the code for the wheelchair to get the code for the controller view original project here. Ensure the nRF24 library and the mpu6050 library are installed, or the code will not run.
#include <nRF24L01.h>
#include <printf.h>
#include <RF24.h>
#include <RF24_config.h>
#include <SPI.h>      //SPI library for communicate with the nRF24L01+
#include "RF24.h"     //The main library of the nRF24L01+

int inches = 0;

int cm = 0;

long readUltrasonicDistance(int triggerPin, int echoPin)
{
  pinMode(triggerPin, OUTPUT);  // Clear the trigger
  digitalWrite(triggerPin, LOW);
  delayMicroseconds(2);
  // Sets the trigger pin to HIGH state for 10 microseconds
  digitalWrite(triggerPin, HIGH);
  delayMicroseconds(10);
  digitalWrite(triggerPin, LOW);
  pinMode(echoPin, INPUT);
  // Reads the echo pin, and returns the sound wave travel time in microseconds
  return pulseIn(echoPin, HIGH);
}


const int enbA = 8;
const int enbB = 3;

const int IN1 = 7;    //Right Motor (-)
const int IN2 = 6;    //Right Motor (+)
const int IN3 = 5;    //Left Motor (+)
const int IN4 = 4;    //Right Motor (-)

int RightSpd = 130;
int LeftSpd = 130;

int data[2];


RF24 radio(9,10);

const uint64_t pipe = 0xE8E8F0F0E1LL;

void setup(){
  //Define the motor pins as OUTPUT
  pinMode(enbA, OUTPUT);
  pinMode(enbB, OUTPUT);
  pinMode(IN1, OUTPUT);
  pinMode(IN2, OUTPUT);
  pinMode(IN3, OUTPUT);
  pinMode(IN4, OUTPUT);

  Serial.begin(9600);
  radio.begin();
  radio.openReadingPipe(1, pipe);
  radio.startListening();
  }

void loop(){
  cm = 0.01723 * readUltrasonicDistance(A2, A1);
  // convert to inches by dividing by 2.54
  inches = (cm / 2.54);


  if (radio.available()){
    radio.read(data, sizeof(data));
    Serial.println(data[0]);


    if(data[0] > 380){
     if(inches > 5){ //the wheelchair can only go forward if inches is greater than 5
       //forward
       analogWrite(enbA, RightSpd);
       analogWrite(enbB, LeftSpd);
       digitalWrite(IN1, HIGH);
       digitalWrite(IN2, LOW);
       digitalWrite(IN3, HIGH);
       digitalWrite(IN4, LOW);
     }//end distance if

     else{ //prevents wheelchair from going forward if a wall is to close
      analogWrite(enbA, 0);
      analogWrite(enbB, 0);
     }//end else

    }//end if

    if(data[0] < 310){
      //backward
      analogWrite(enbA, RightSpd);
      analogWrite(enbB, LeftSpd);
      digitalWrite(IN1, LOW);
      digitalWrite(IN2, HIGH);
      digitalWrite(IN3, LOW);
      digitalWrite(IN4, HIGH);
    }//end if

    if(data[1] > 180){
      //left
      analogWrite(enbA, RightSpd);
      analogWrite(enbB, LeftSpd);
      digitalWrite(IN1, HIGH);
      digitalWrite(IN2, LOW);
      digitalWrite(IN3, LOW);
      digitalWrite(IN4, HIGH);
    }//end if

    if(data[1] < 110){
      //right
      analogWrite(enbA, RightSpd);
      analogWrite(enbB, LeftSpd);
      digitalWrite(IN1, LOW);
      digitalWrite(IN2, HIGH);
      digitalWrite(IN3, HIGH);
      digitalWrite(IN4, LOW);
    }//end if

    if(data[0] > 330 && data[0] < 360 && data[1] > 130 && data[1] < 160){
      //stop car
      analogWrite(enbA, 0);
      analogWrite(enbB, 0);
    }//end if
  }
}
If I were to continue working on this project in the future, I would move the front sensor down so it would have a better view. I would also add a sensor on the back to prevent crashing when going in reverse. I would also change the design of the wheelchair to make it less back-heavy.

